

How To Create Python Application
This browser is no longer supported.
Upgrade to Microsoft Edge to take advantage of the latest features, security updates, and technical support.
- Feedback
- Edit
Quickstart: Create your first Python web app using Visual Studio
- 9 minutes to read
Thank you.
In this 5-10 minute introduction to Visual Studio as a Python IDE, you create a simple Python web application based on the Flask framework. You create the project through discrete steps that help you learn about Visual Studio's basic features.
If you haven't already installed Visual Studio, go to the Visual Studio downloads page to install it for free. In the installer, make sure to select the Python development workload.
If you haven't already installed Visual Studio, go to the Visual Studio downloads page to install it for free. In the installer, make sure to select the Python development workload.
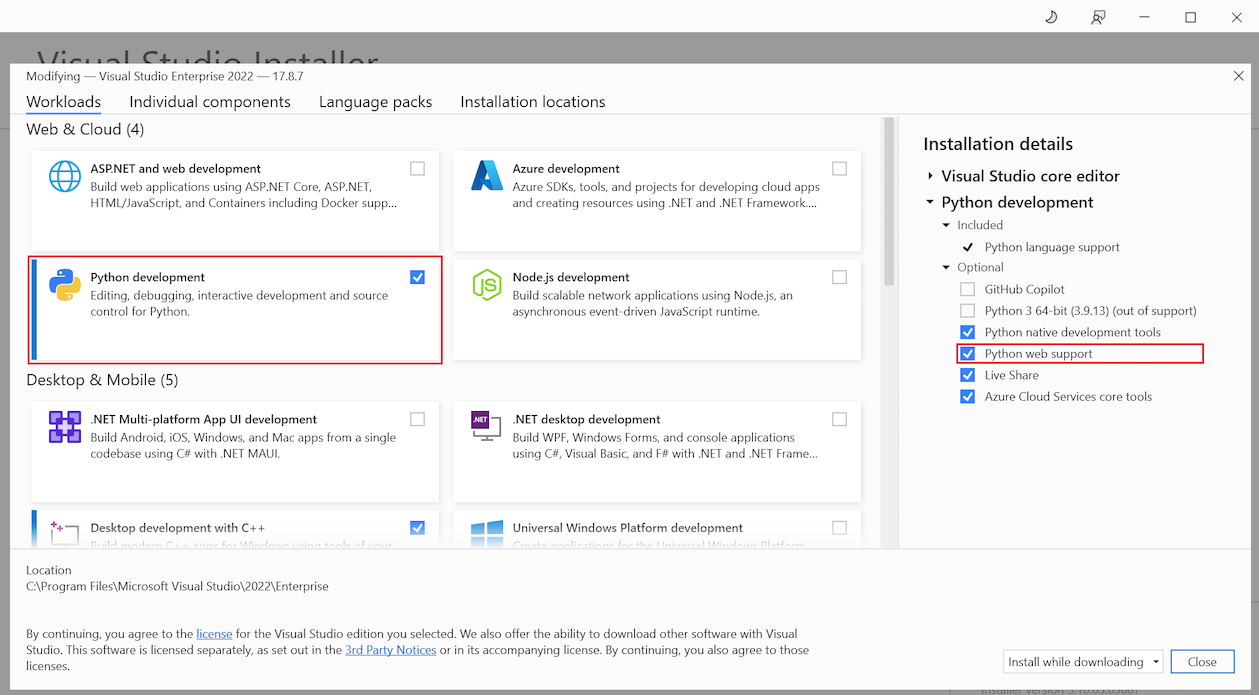
If you haven't already installed Visual Studio, go to the Visual Studio downloads page to install it for free. In the Visual Studio Installer, select the Python development workload, and in the installation details, select Python web support.
Create the project
The following steps create an empty project that serves as a container for the application:
-
Open Visual Studio 2017.
-
From the top menu bar, choose File > New > Project.
-
In the New Project dialog box, enter "Python Web Project" in the search field on the upper right, choose Web project in the middle list, give the project a name like "HelloPython", then choose OK.

If you don't see the Python project templates, run the Visual Studio Installer, select More > Modify, select the Python development workload, then choose Modify.

-
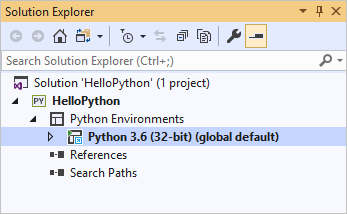
The new project opens in Solution Explorer in the right pane. The project is empty at this point because it contains no other files.

-
Open Visual Studio 2019.
-
On the start screen, select Create a new project.
-
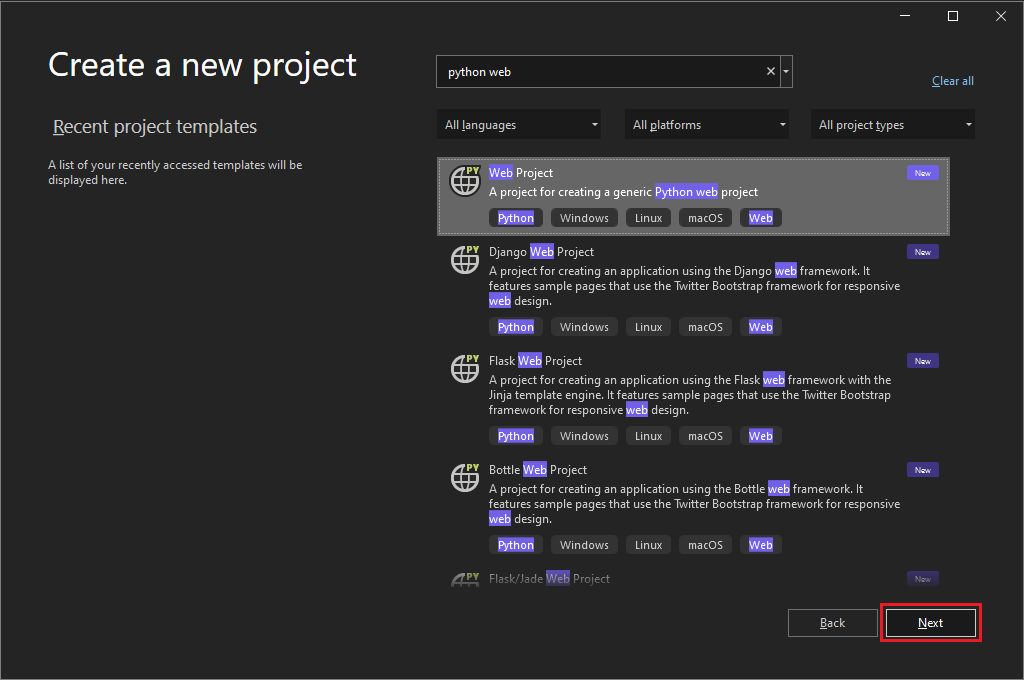
In the Create a new project dialog box, enter "Python web" in the search field at the top, choose Web Project in the middle list, then select Next:
 If you don't see the Python project templates, run the Visual Studio Installer, select More > Modify, select the Python development workload, then choose Modify.
 -
In the Configure your new project dialog that follows, enter "HelloPython" for Project name, specify a location, and select Create. (The Solution name is automatically set to match the Project name.)
-
The new project opens in Solution Explorer in the right pane. The project is empty at this point because it contains no other files.
-
Open Visual Studio 2022.
-
On the start screen, select Create a new project.
-
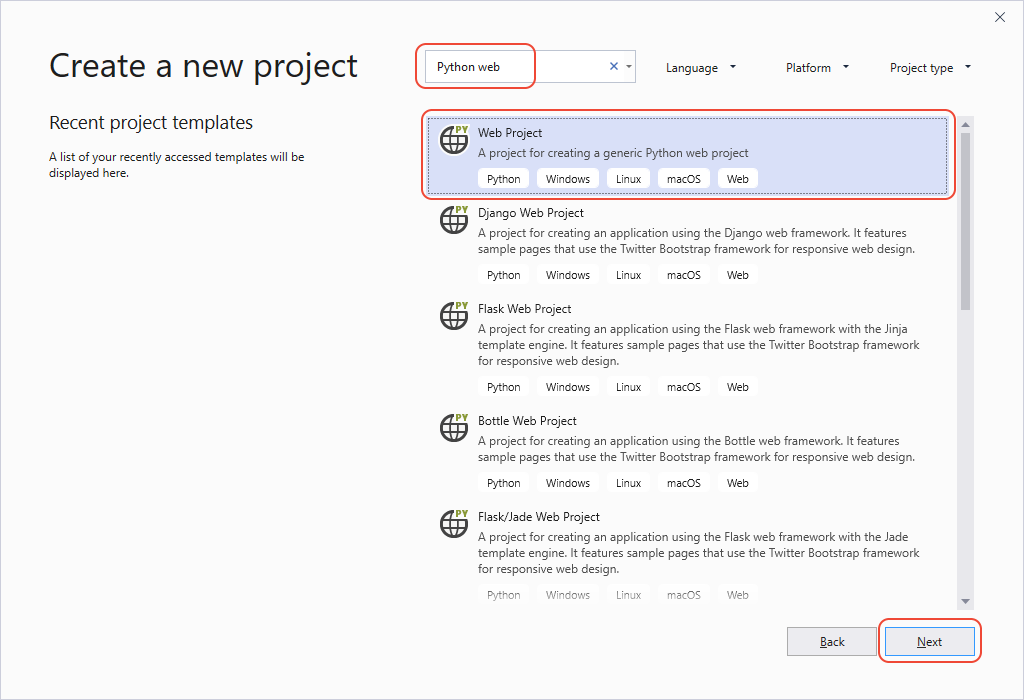
In the Create a new project dialog box, enter "Python web" in the search field at the top. Choose Web Project from the list, and then select Next:
If you don't see the Python web project templates, select Tools > Get Tools and Features to run the Visual Studio Installer. In the Installer, select the Python development workload, and under Installation details, select Python web support. Then select Modify.
-
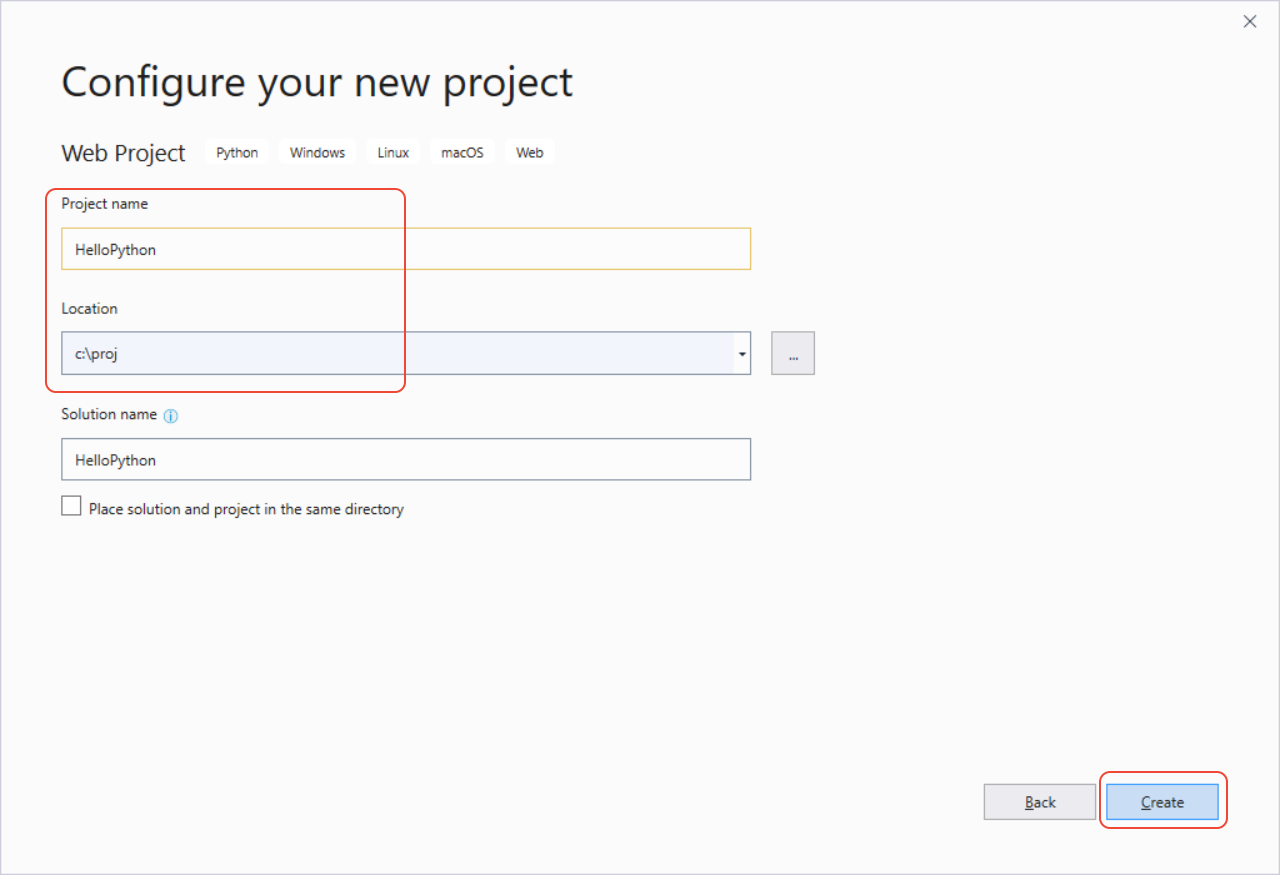
In the Configure your new project dialog box, enter "HelloPython" for Project name, specify a location, and then select Create. The Solution name automatically updates to match the Project name.

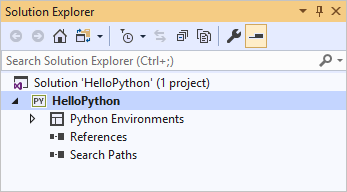
The new project opens in Solution Explorer in the right pane. The project is empty at this point because it contains no other files.

Question: What's the advantage of creating a project in Visual Studio for a Python application?
Answer: Python applications are typically defined by using only folders and files, but this simple structure can become burdensome as applications grow larger. Applications can involve auto-generated files, JavaScript for web applications, and other components. A Visual Studio project helps manage this complexity.
The project, a .pyproj file, identifies all the source and content files associated with your project. The .pyproj file contains build information for each file, maintains information to integrate with source-control systems, and helps organize your application into logical components.
Question: What is the "solution" shown in Solution Explorer?
Answer: A Visual Studio solution is a container that helps you manage one or more related projects as a group. The solution stores configuration settings that aren't specific to a project. Projects in a solution can also reference one another. For example, running a Python app project can automatically build a second project, like a C++ extension that the Python app uses.
Install the Flask library
Web apps in Python almost always use one of the many available Python libraries to handle low-level details like routing web requests and shaping responses. Visual Studio provides many templates for web apps. You use one of these templates later in this Quickstart.
Use the following steps to install the Flask library into the default global environment that Visual Studio uses for this project.
-
Expand the Python Environments node in the project to see the default environment for the project.

-
Right-click the environment and select Install Python Package. This command opens the Python Environments window on the Packages tab.
-
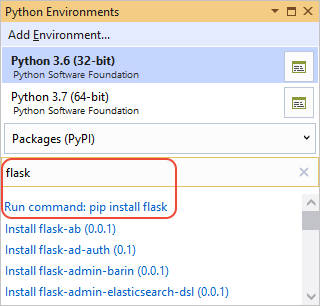
Enter "flask" in the search field and select pip install flask from PyPI. Accept any prompts for administrator privileges and observe the Output window in Visual Studio for progress. (A prompt for elevation happens when the packages folder for the global environment is located within a protected area like C:\Program Files.)

-
Expand the Python Environments node in the project to see the default environment for the project.
-
Right-click the environment and select Manage Python Packages.... This command opens the Python Environments window on the Packages (PyPI) tab.
-
Enter "flask" in the search field. If Flask appears below the search box, you can skip this step. Otherwise select Run command: pip install flask. Accept any prompts for administrator privileges and observe the Output window in Visual Studio for progress. (A prompt for elevation happens when the packages folder for the global environment is located within a protected area like C:\Program Files.)
-
Expand the Python Environments node in the project to see the default environment for the project.
-
Right-click the environment and select Manage Python Packages. This command opens the Python Environments window on the Packages (PyPI) tab.
-
Enter "flask" in the search field. If Flask appears below the search box, you can skip this step. Otherwise, select Run command: pip install flask.
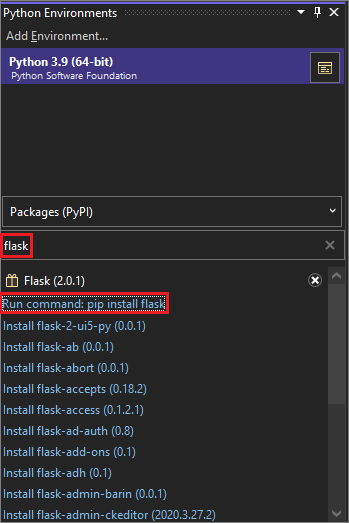
An elevation prompt appears if the global environment packages folder is in a protected area like C:\Program Files. Accept any prompts for administrator privileges. Observe the Visual Studio Output window for progress.
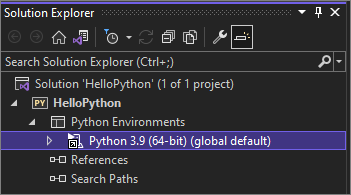
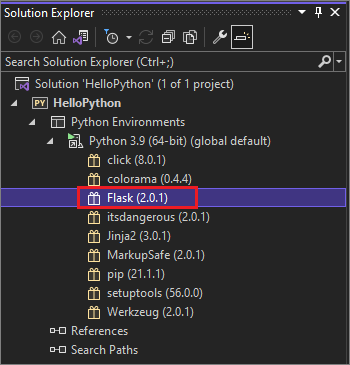
Once installed, the library appears in the environment in Solution Explorer, which means you can use it in Python code.


Note
Instead of installing libraries in the global environment, developers typically create a "virtual environment" in which to install libraries for a specific project. Visual Studio templates typically offer this option, as discussed in Quickstart - Create a Python project using a template.
Question: Where do I learn more about other available Python packages?
Answer: Visit the Python Package Index.
Add a code file
You're now ready to add a bit of Python code to implement a minimal web app.
-
Right-click the project in Solution Explorer and select Add > New Item.
-
In the dialog that appears, select Empty Python File, name it app.py, and select Add. Visual Studio automatically opens the file in an editor window.
-
Copy the following code and paste it into app.py:
from flask import Flask # Create an instance of the Flask class that is the WSGI application. # The first argument is the name of the application module or package, # typically __name__ when using a single module. app = Flask(__name__) # Flask route decorators map / and /hello to the hello function. # To add other resources, create functions that generate the page contents # and add decorators to define the appropriate resource locators for them. @app.route('/') @app.route('/hello') def hello(): # Render the page return "Hello Python!" if __name__ == '__main__': # Run the app server on localhost:4449 app.run('localhost', 4449)
-
Right-click the project in Solution Explorer and select Add > New Item.
-
In the dialog that appears, select empty. For Name, enter app.py, and then select Add. Visual Studio automatically opens the file in an editor window.
-
Copy the following code and paste it into app.py:
from flask import Flask # Create an instance of the Flask class that is the WSGI application. # The first argument is the name of the application module or package, # typically __name__ when using a single module. app = Flask(__name__) # Flask route decorators map / and /hello to the hello function. # To add other resources, create functions that generate the page contents # and add decorators to define the appropriate resource locators for them. @app.route('/') @app.route('/hello') def hello(): # Render the page return "Hello Python!" if __name__ == '__main__': # Run the app server on localhost:4449 app.run('localhost', 4449)
You might have noticed that the Add > New Item dialog box displays many other types of files you can add to a Python project, including a Python class, a Python package, a Python unit test, web.config files, and more. In general, these item templates are a great way to quickly create files with useful boilerplate code.
Question: Where can I learn more about Flask?
Answer: Refer to the Flask documentation, starting with the Flask Quickstart.
Run the application
-
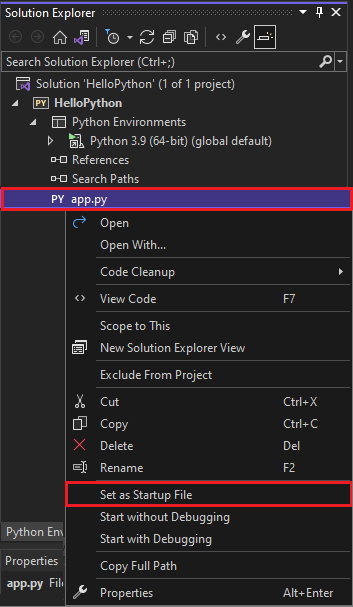
In Solution Explorer, right-click app.py and then select Set as Startup File from the dropdown menu. This command identifies the code file to launch in Python when running the app.


-
Right-click the project in Solution Explorer and select Properties. Select the Debug tab from the Properties menu, and set the Port Number property to
4449. This setting ensures that Visual Studio launches a browser withlocalhost:4449to match theapp.runarguments in the code. -
Select Debug > Start Without Debugging or press Ctrl+F5, which saves changes to files and runs the app.
-
A command window appears with the message Running in https://localhost:4449. A browser window opens to
localhost:4449and displays the message Hello, Python! TheGETrequest also appears in the command window with a status of200.If a browser doesn't open automatically, start the browser of your choice and navigate to
localhost:4449.If you see only the Python interactive shell in the command window, or if that window flashes on the screen briefly, make sure app.py is set as the startup file.
-
Navigate to
localhost:4449/helloto test that the decorator for the/helloresource also works. Again, theGETrequest appears in the command window with a status of200. Try some other URLs as well to see that they show404status codes in the command window. -
Close the command window to stop the app, and then close the browser window.
Question: What's the difference between the Start Without Debugging and Start Debugging commands?
Answer: You use Start Debugging to run the app in the context of the Visual Studio debugger. With the debugger, you can set breakpoints, examine variables, and step through your code line by line. Apps might run slower in the debugger because of the hooks that make debugging possible.
Start Without Debugging runs the app directly, as if you ran it from the command line, with no debugging context. Start Without Debugging also automatically launches a browser, and navigates to the URL specified in the project properties' Debug tab.
Next steps
Congratulations on running your first Python app from Visual Studio. You've learned a little about using Visual Studio as a Python IDE!
Because the steps you followed in this Quickstart are fairly generic, you've probably guessed that they can and should be automated. Such automation is the role of Visual Studio project templates. Go through Quickstart - Create a Python project using a template to create a web app similar to the one in this article, but with fewer steps.
To continue with a fuller tutorial on Python in Visual Studio, including using the interactive window, debugging, data visualization, and working with Git, follow Tutorial: Get started with Python in Visual Studio.
To explore more that Visual Studio has to offer, select the links below.
- Learn about Python web app templates in Visual Studio.
- Learn about Python debugging
- Learn more about the Visual Studio IDE in general.
Feedback
How To Create Python Application
Source: https://docs.microsoft.com/en-us/visualstudio/ide/quickstart-python
Posted by: aleshirehadly1981.blogspot.com
0 Response to "How To Create Python Application"
Post a Comment